Microsoft Word for Language Teachers – part 2
In the post Microsoft Word for Language Teachers – Part 1 I explain how to use the Teacher´s Pet add-on and I share a simple macro to create the Swimming Pool worksheets. In this post, I am going to offer you more macros which will help you create vocabulary worksheets in no time.
ADVERT:
[showmyads]
Type your list of words + their translation. Change the page to landscape view. Change the numberofwords value to the number of words in your list. Click Developer and find the Crosses and noughts Macro. Run the macro and your worksheet is finished. (See the video for more detailed instructions.)
Once you have this worksheet, print one for each student in your group. Moreover, you need to prepare a list of words which you used in the worksheet (a simple table with the words and their translation will do).
Tell the students to take the list of words. Read the words aloud and ask them to repeat. Do this at least twice. Then give your students about two minutes to learn the words from the list.
Then they put the list of words away and play the game noughts and crosses. One of the students plays noughts and the other crosses. Before they can place a nought or a cross anywhere in the grid, they have to say the corresponding word in English. If their partner agrees that the word is correct, they can place their symbol into the given square. However, if they do not agree, they need to check using the list and if they are wrong, they have to play somewhere else.
The aim of each player is to create a line of 5 uninterrupted symbols. These can be in line, diagonal or in a column and there must be no free spaces in the line. I usually let my students play for seven minutes and then I stop the game.
Then students have 4 minutes to write as many words into their grids as possible. They may use the word lists but they mustn’t skip any words. The best performance has been 8 full columns.
More activities
The first one is called Spill the Beans. Each student gets the grid and 4 beans. They spill their beans on the grid and they have 30 seconds to say all the words their beans cover or touch. They get one point for each correct answer.
The second game is called Tennis. Make the middle line of the grid thicker so it looks like the one in the picture below.
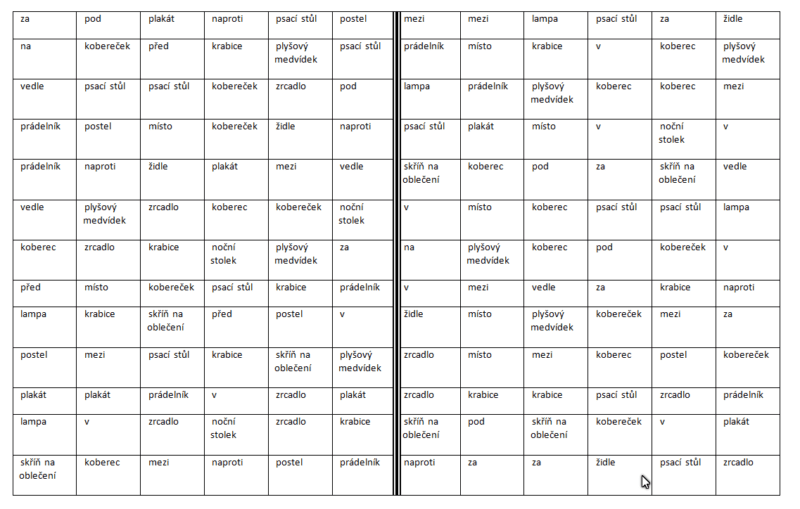
Students need a bean and a pencil. One student puts the bean on her half and pushes it with her pencil to the other half. Then she has to say the words the bean covers or touches. Students get one point for each correct word. Students play for 7 minutes and the winner is the one who gets more points.
If the bean doesn´t cross the thick line, their partner gets an extra turn and she says all the words the bean covers or touches. Put simply, if the bean is on your half, you try to push over the net (the thick line) and your partner says the words. If the bean stops on the rival´s half, you say the word.
Again, when the game finishes, I ask the students to fill in as many columns as possible in four minutes.
Microsoft Word – Remembering tables
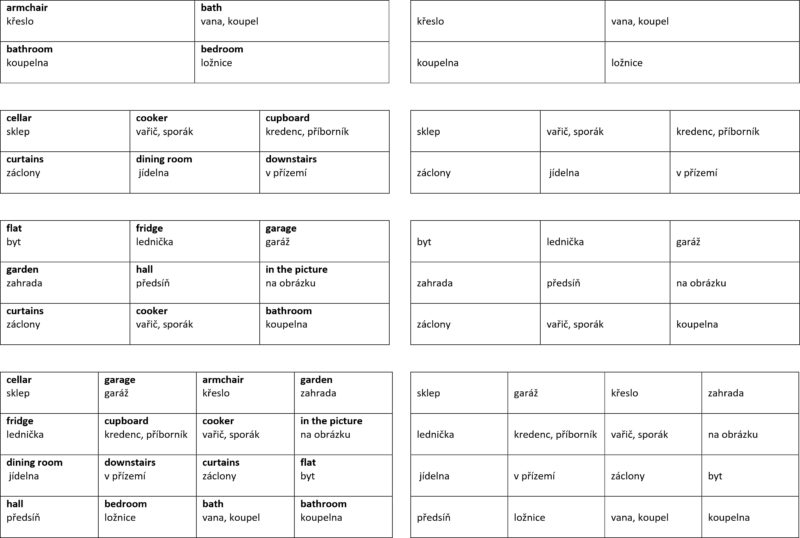
Obviously, it is not easy to create such tables and that is why I asked an expert on Microsoft Word to create the macro for me. This time, you need to download the following file.
And how do you use the remembering tables? Start at the top. Read the English words in the first table and ask your students to repeat them. Do it at least twice. Then the students have 20 seconds to remember the 4 words from the first table. After the twenty seconds, they cover the table on the left and try to complete the table on the right. When they finish their work, they look at the table on the left and check + correct their answers. If they cannot remember any word, they can have a look and complete the table on the right with this help.
You do the same with the rest of the tables. The only difference is the time the students have for learning the words. For the second table, they have 30 seconds, for the third they have 45 seconds and for the last one they have only 40 seconds because all the words there have already been taught.
I hope you will find these macros and activities useful and that you will use them in your lessons. If you have more ideas for Macros, share them in the comments below.
